How to Prepare the Base for a Sturdy Interlocking Driveway Paving Installment
Most paver failings trace back to the base. Not the pavers themselves, not the polymeric sand, not even the installer's pattern selection. If the base resolves, the surface area telegrams every blunder. I once reviewed a Driveway Paving Installation where the owners had actually chosen lovely granite-textured pavers. The driveway looked ideal for 7 months, then the tire courses became shallow channels, the apron heaved after a freeze, and weeds colonized the joints. The wrongdoer was not the stone or the crew's workmanship up top, it was an underbuilt base laid over wet, silty soil without geotextile. That job price twice to repair what it would have set you back to do appropriate once.
A solid base does 3 tasks: it spreads out lots so there is no factor stress on weak dirts, it drains rapidly so freeze-thaw cycles do not jack the sidewalk around, and it resists movement at the edges and under wheels. If you obtain those 3 right, the noticeable surface has a tendency to remain tight and smooth for years. The following is the strategy I make use of for interlocking pavers on driveways and pathways when durability matters.
Start with the website and the soil
Before anyone touches a shovel, take a look at how water moves across the residential property and what the indigenous dirt holds underneath those initial few inches. I stroll the site after a rain if possible. Reduced places with standing water, moss growth along edges, and black touches in the base of a yard pool deck paver company tell you where water drainage currently has a hard time. For a Walkway Paving Installment, you can sometimes escape a lighter construct due to the fact that foot traffic is mild, however water still manages the outcome. For a driveway, you need to assume repetitive factor tons, turning pressures, and snowplow abrasion.
Soil dictates both exactly how deep you should dig and what you should separate from the granular base. Broadly:
- Sands and gravels drain rapidly, hold form under tons, and permit thinner areas. They can ravel under resonance if also loose.
- Silts and clays hold water, pump under load, and expand when frozen. They require thicker sections and splitting up fabrics.
- Organics and fill are unforeseeable. If you see black, fertile material or layers of construction debris, over-excavate until you strike competent subgrade.
When I probe with a screwdriver or a penetrometer, I am really feeling for suppleness and dampness. If the device slides in more than an inch or 2 with moderate initiative, the dirt is most likely weak when damp. In that situation, strategy to go deeper and use geotextile. A fast, unrefined test I use for possible frost action is to round a handful of moist subsoil and drop it from waistline elevation. If it shatters, it is a driveway replacement experts lot more granular. If it sags or sticks, you have a silty or clayey issue child.
Set elevations, grades, and transitions
A successful base begins with lines and degrees. You are forming a superficial, permeable structure with precise leading and lower aircrafts. The leading aircraft, the paver surface, needs a constant crossfall so water relocates off swiftly. For driveways, target 2 percent slope, which is a quarter inch per foot. Walkways can operate at 1 to 2 percent relying on conditions. Much less than 1 percent is requesting for pools. More than 3 percent on pavers becomes uncomfortable to walk and brake on.
I established string lines or utilize a rotating laser to establish surface altitudes at bottom lines, then work in reverse to compute base and subgrade midsts. If the paver density is 2.375 inches and the bed linen layer is one inch after compaction, and I desire 8 inches of compressed base over a soft subgrade, my excavation target is about 11.5 to 12 inches below finished grade. Constantly provide yourself an added half inch due to the fact that loosened bed linen and minor high areas in the subgrade consume margin fast.
Transitions Artificial Turf Installation cost to existing surface areas matter. At the garage, I aim for a flush entry or a mild 1 inch decrease so melting snow goes out, not under the door. At the street, check the municipal apron height and prevent developing a lip that catches plow blades. When pavers fulfill a concrete walk, plan for a small saw cut and a clean edge restriction to lock every little thing together.
Choose the right base material
On most of my projects, the base is a well rated crushed stone that secures under compaction. Areas call it different things, however the concept is the same. You want a blend of angular aggregate sizes from penalties up to three quarter inch or often one inch, so the little bits load the voids and the mass interlocks.
For residential driveways in freeze climates, a common area is 6 to 12 inches of compacted base over subgrade, thicker on clay and in cold zones. Walkways can be 4 to 8 inches, once more relying on soil. I seldom go listed below 8 inches on a driveway with clay subgrade. If a client plans to park a recreational vehicle or delivery van make normal visits, 12 to 16 inches is appropriate.
Recycled concrete accumulation can work if it is tidy and well refined. It condenses perfectly, however you need to make certain there is no rebar, plaster, or light-weight trash in the tons. I stay clear of pure sedimentary rock penalties as a bed linen training course, since they can hold water and move. Conserve the bed linens for a sharp concrete sand or a made screening developed for pavers.
Open graded base, the kind with larger rock and couple of fines, has actually acquired popularity with absorptive leading systems. It drains quickly and resists frost heave by not holding water, but it calls for certain bed linens layers and restraints to avoid bit movement. For a basic interlacing Driveway Paving Installation, a thick graded base is much more forgiving and much easier to screed for novices.
The situation for geotextile
Geotextile is low-cost insurance. I use a nonwoven splitting up material over silty or clay subgrades and over any location where I think pumping under lots. The material sits directly on the ready subgrade, after that the rock goes on top. Its task is not toughness but splitting up. Without it, penalties move upward into the base, and your compressed stone loses framework over time.
Choose a nonwoven textile with ample slit resistance, usually defined by weight in ounces per square lawn and ASTM ratings. For driveways, I search in the 4 to 8 ounce range relying on dirt. The textile must overlap 12 to 18 inches at joints and extend somewhat up the sides of the excavation to cover the base. I have actually brought up stopped working sections where the base looked like a split cake of mud and stone. After replacement with material and a thicker base, the same site held up for years.
Excavation and subgrade preparation
Excavate to your computed deepness and keep all-time low as level as functional with the intended slope. Remove organics, roots, and soft pockets up until you strike uniform, strong product. If you dig deeper than prepared in a place, do not backfill with topsoil. Bring the area up with the very same base rock you plan to make use of and small it in lifts.
Subgrade strength is simple to overestimate. I run a plate compactor or a small roller over the exposed subgrade to tighten up the leading half inch and spot weak areas. If the subgrade rutting under compaction goes beyond a quarter inch, or if water pumps to the surface area, stop and readjust. On soft soils, including 2 to 4 inches of larger rated rock as a connecting layer under your base can support things, particularly with fabric.
Never compact a waterlogged subgrade. Allow it completely dry to a moist, workable state. You can tarp locations to keep a rain off, or put down the textile promptly and add a sacrificial layer of rock to get tools onto the site without rutting. Work smart around energies. If you reveal a gas or water line, mark it and adjust compaction technique near it. Hand tamping close to shallow lines avoids risk.
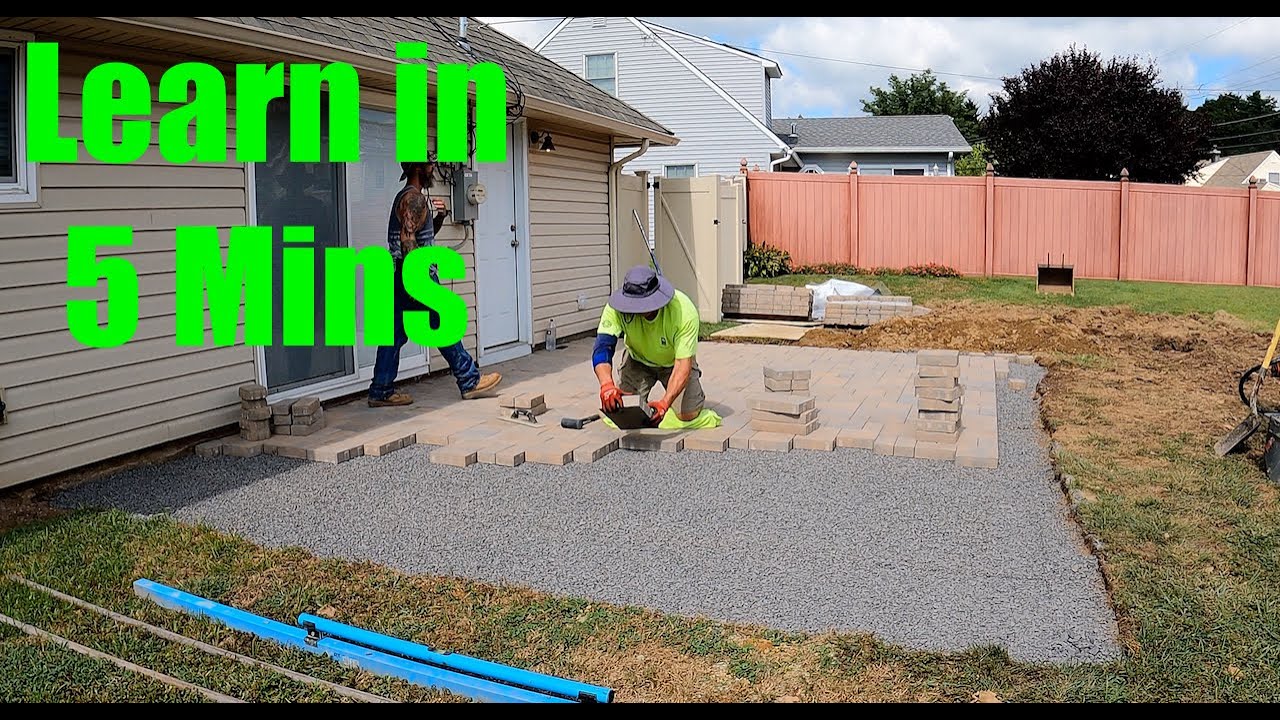
Placing and compacting the base
Compaction quality makes a decision life expectancy. I utilize a relatively easy to fix plate compactor in the 400 to 700 extra pound class for the majority of property job. On bigger driveways or where density surpasses 10 inches, a small dual drum roller conserves time and offers much more uniform density. The technique is to construct the base in thin lifts, each compressed to rejection prior to the following drops. I keep each lift to 3 inches loosened on thick rated stone. 4 inches is a tough restriction on small plates. If you dump 8 inches simultaneously, the top will certainly look limited while all-time low continues to be loosened, and the whole mass will certainly work out later under traffic.
Moisture is the other half of compaction. Too completely dry and the penalties will certainly not reorganize. Also damp and the stone will certainly pump. I aim for a moist, great feel when I squeeze a handful. If dirt clouds ripple under the compactor, haze the surface area with a hose pipe. If water glistens and the plate leaves a film, allow it drain pipes or dry. Two to four passes per lift, overlapped by half home plate width, are regular. On sides and tight corners, utilize a hand tamper or a smaller plate to prevent scarring.
On lengthy driveways, I run a straightedge or a string across the base every 6 to 8 feet. Check elevations relative to your standards. It is much easier to shave or include rock at the base phase than to deal with altitudes later with bedding sand, which must be no more than an inch thick. I like to see no greater than a quarter inch of variation under a 10 foot straightedge at this stage.
Managing sides and restraints
Edge restriction maintains the pavers from slipping under wheels or frost. For driveways, I like concrete visuals or cast in position concrete buttocks along the sides. Plastic edge restraints with long spikes can work, yet they need a solid, compressed base and stakes driven right into secure material, not into loosened bed linens sand. Where the driveway satisfies a yard, a hidden concrete edge set just listed below grass height offers a clean line and a lawn mower evidence boundary.
At the street, an enhanced concrete apron or a row of soldier program pavers secured right into a concrete beam of light stands up to rake blades and transforming pressures. If you prepare to tie into an existing asphalt road, cut a tidy side and set up the restriction under the paver line so the user interface remains tight. For a Walkway Paving Setup that meanders through a yard, a flexible plastic restraint is often enough, yet the base below still needs compaction bent on the edge.
Bedding layer and why it is not a fixer for base errors
The bed linens layer exists to seat the pavers and enable tiny elevation changes, not to level significant waves. For traditional pavers, make use of concrete sand with a consistent gradation or a made bed linens material developed for pavers. Screed rails set to the appropriate elevation overview a straightedge, and the loosened screeded layer needs to be about 1.25 inches prior to compaction of the pavers presses it to about one inch. If your base is off by half an inch, stand up to need to develop that in bedding. Draw the sand, readjust the base, then re screed. Bed linens that is too thick relocations under load and takes out of the joints under vacuum pressures from traffic.
Dealing with water: drainpipe courses, materials, and frost
Water locates every path and punishes faster ways. A driveway base should either shed water to the sides quickly or move it downward into a outdoor step construction design complimentary draining layer that does not hold it near the freezing airplane. On a fundamental dense graded base, go across incline and shoulder drain are your allies. If the driveway beings in a dish or if clay locks wetness in, consider a boundary drainpipe or a French drain covered in fabric to lug water away. I have mounted 4 inch perforated pipe along the low side of lengthy drives, bedded in clean stone and covered in nonwoven material, daylighted to a lower altitude. The base remained completely dry via spring thaws where neighbors' drives heaved.
In chilly areas, the frost line dictates care. The base does not require to visit frost deepness, however it must protect against water from capturing. Prevent great products at the bottom that hold wetness. If the soil is frost susceptible, thicker base, geotextile splitting up, and perhaps a layer of open graded stone beneath the dense base assistance. In very chilly areas, a foam insulation layer at the edges near structures can manage differential heave, but that is a detail to design with care.
Load categories and sizing the base
Not all driveways see the exact same misuse. A narrow solitary cars and truck run, lightly made use of by a portable car, is different from a vast court that hosts delivery trucks and turn-arounds. I categorize loads by axle weight and regularity. For regular country use, 8 inches of compressed dense graded base performs well on decent subgrade. For frequent hefty lots, upsize to 12 inches and broaden the compressed base beyond the paver side by a minimum of 6 inches to support turning wheels. If there is a curb or a wall surface confining one side, think about wheel tons concentration and add density on that side.
When a client asks if they can park a 9,000 extra pound recreational vehicle for weeks, I counsel two modifications. First, boost base density and potentially switch to an open rated base with proper restrictions to decrease moisture under the get in touch with location. Second, widen the load paths and, if spending plan enables, utilize thicker pavers rated for car service. The base still does the majority of the job, yet the surface area density helps spread out load.
Quality control that pays back
Strong routines protect against do overs. I log compaction passes per lift, and if a paving-related drainage products plate seems to ride in different ways, I stop and check dampness. An evidence roll with a loaded vehicle is useful on bigger jobs. Drive gradually across the base and watch for deflection. If the base disperses more than a quarter inch under a hefty axle, address it prior to moving on.
Measure, do not think. An easy dirt probe or significant shovel aids keep lift thickness honest. A straightedge made use of every few feet catches bulges and lows. Photograph layers for your records, particularly textiles and drains that go away under rock. If an area will sit revealed to weather overnight, crown it a little and tarp if rain is anticipated. Saturated base can take days to recover.
Common errors and just how to avoid them
The worst mistakes repeat across jobs. Relying on bed linens sand to correct a bumpy base causes rutting. Missing geotextile over clay welcomes migration and pumping. Compacting thick lifts saves time in the moment and expenses weeks later on when tire tracks appear. Overlooking water creates long-lasting maintenance. Weak or missing side restraints allow pavers sneak under turning motions, especially near a garage where tires scrub while drivers guide at reduced speed.
There are likewise subtler bad moves. Getting rid of too much topsoil in a limited metropolitan front backyard can drop the driveway relative to the surrounding pathway, developing an unpleasant lip. Puncturing a tree origin area without a strategy can destabilize a mature tree and invite long-term negotiation as the roots degeneration. In those cases, bridge over origins with superficial excavation and a geogrid enhanced base, or readjust alignment.
Cost and time, with reasonable ranges
Homeowners commonly ask what an appropriately built base prices. Material and labor vary by area, yet you can assume in ranges per square foot for the base part alone. Thick rated stone provided runs in the series of 30 to 60 dollars per lot in many markets, and you need roughly 1.5 tons per cubic backyard. An 8 inch layer has to do with 0.67 cubic backyards per 100 square feet, so the rock alone could run 15 to 40 bucks per 100 square feet, before delivery and tax. Add fabric at about 0.30 to 0.60 dollars per square foot. Devices, labor, and disposal of spoils press the mounted base expense into the 6 to 12 bucks per square foot array in numerous locations, occasionally more in high expense cities or limited sites.
Time relies on accessibility, weather, and team dimension. A two person staff with a skid steer and a plate compactor can dig deep into and develop base for 400 to 800 square feet of driveway in 2 to 3 days, assuming normal depth and good soil. Add a day if you are working in clay or if trucking spoils off site involves a long haul. Do not hurry compaction to hit a routine. I have stopped briefly jobs for a day to allow a rainfall drenched subgrade completely dry instead of pushing mud around and developing a future failure.
Environmental considerations without giving up performance
A well drained base can likewise be a responsible one. Recycled concrete aggregate, when sourced from a respectable recycler, minimizes demand for quarry stone and carries out well under compaction. Making use of an open rated base under permeable pavers can reenergize groundwater and ease overflow, however it calls for thoughtful layout of the subgrade and overflow approach. In cool areas, salt escape is a problem. Excellent drain and tight joints decrease pooling and the amount of deicer needed.
Spoils disposal offers an additional opportunity. Clean topsoil and turf can commonly be reused on website to regrade lawns or build planting beds. Rock excess, if uncontaminated, can be saved for future fixings or made use of under sheds or as a subbase for garden paths.
A practical sequence that services real sites
- Walk the website, established qualities, mark utilities, and define edges. Develop finish elevations and determine excavation midsts from there.
- Excavate to depth, preserving incline, and eliminate organics. Compact the subgrade lightly and identify weak points that need geotextile or linking stone.
- Lay nonwoven geotextile where required, overlapping seams. Area base in lifts of 3 inches loose, small each lift completely with dampness control.
- Shape the base to last quality with a straightedge, tight to within a quarter inch over 10 feet. Install side restrictions on a compressed base, not on bedding.
- Screed a one inch bedding layer of suitable sand or produced product, then location and compact pavers, fill joints, and re compact.
That five step overview conceals a hundred mini choices, however if you strike each significant factor cleanly, the details typically fall into place.
Special situations: high drives, clay basins, and tight metropolitan lots
Steep driveways test traction throughout construction and solution. I restrict lift thickness a lot more on inclines, and I orient compaction passes vertical to the autumn where secure. Edge restrictions require additional attention, frequently concrete, and cross incline must not exceed what fits for lorries to go across without bottoming. On long, steep runs, break water with touchdown locations if the residential or commercial property enables, so water rate does not deteriorate joints.
Clay containers, the traditional bowl formed front yard where water rests after storms, determine a hostile drain strategy. I have reduced a superficial trench along the low side, wrapped perforated pipeline in textile and tidy rock, and attached it to a completely dry well or to the tornado system where lawful. The trick is to offer water a trusted leave that does not undermine the base.
Tight lots bring spoil management and hosting frustrations. When road auto parking is limited and you have no space for a rock stack, timetable distributions in smaller sized loads timed to compaction progress. Use plywood or ground protection floor coverings to shield neighbors' lawns and stay clear of transforming the task right into a polite problem.
Verifying success before any kind of paver touches the ground
A completed base needs to seem like walking on concrete. Your boot should not dent the surface area. A 10 foot straightedge need to expose only tiny, steady variants. Water from a hose need to run constantly to the developed reduced side without merging. If you have the persistence, leave the base exposed for a day of website traffic from a loaded pick-up or a little dump truck. Watch for ruts. If the base disregards that test, it is ready.
I usually invite the property owner to walk it with me at this stage. When they really feel exactly how solid it is and see the precise form, they recognize where their cash went. The pavers they selected will look excellent whatever, yet just a well prepared base will make them look helpful for a decade.
A brief troubleshooting list for base preparation
- Tire tracks or ruts show up during compaction: reduce lift thickness, adjust dampness, and consider geotextile over the subgrade.
- Base looks limited but pumps water at the surface area: time out, allow it drain pipes, and add a linking layer of larger stone if needed.
- Elevations drift along the run: reset a couple of string line criteria and check every 8 feet with a straightedge, dealing with at the base, not in bedding.
- Edges feel soft near restrictions: broaden the compressed base beyond the paver line and re compact with added passes, then reset the restriction on the rock, out sand.
- Water swimming pools at the reduced end after a pipe examination: adjust cross incline and include or unblock drain paths before proceeding.
Bringing all of it together for durable paver work
Interlocking pavers are forgiving at the surface. You can change a tarnished item, move a pattern, or re sand a joint in a mid-day. The base is not so forgiving. It specifies the feel underfoot and under tire for the life of the installment. Approach it with the same treatment a carpenter offers to a structure. Strategy the qualities, comprehend the dirt, separate weak product with textile, portable in honest lifts with dampness control, and lock the sides. That mindset applies throughout both Driveway Paving Installation and Pathway Paving Setup. The difference is mostly in density and restraint, not in the concepts. Construct the base as if you will drive a truck on it before you ever set a paver, and the completed surface area will thank you every period that passes.