Fence Contractor Tips for Double-Drive and Recreational Vehicle Gates
Double-drive and RV gates look simple from the curb, but they are structural systems that live with wind, slope, vehicles, and people who are sometimes in a hurry. Build them like furniture and they will sag. Build them like bridges and they will swing true for years. The difference comes from the details, and that is where a good Fence Contractor earns trust.
What sets double-drive and RV gates apart
A single walk gate cares about foot traffic. A double-drive or RV gate carries real loads, both static and dynamic. Each leaf might span 6 to 10 feet. Wind pushes on broad surfaces. Tires ride over center stops and occasionally nudge them. Family members yank on latches. Delivery trucks clip the edges. If one hinge pin or one weld drifts out of square, the entire assembly tells on you by dragging or drifting open.
RV gates add a second layer of demands. They must clear wide mirrors, tall rooflines, and long trailers that pivot slowly. A 30 to 40 foot rig needs a clean approach angle and space to swing without jackknifing a fender. That means proper width, set-back from the street, and a hinge geometry that does not steal opening angle.
Fencing Contractors who build these gates regularly develop an instinct for geometry, frost, wind, and human behavior. That is the lens I bring to every project.
Start with the site, not the catalog
Before talking about styles, walk the driveway and the yard. Put your boot where the tires track and look up, down, and sideways. Ask how the property is used. Where does the RV turn in from, what is the slope as it crosses the sidewalk, where do trash cans sit on pickup day, and which way does the winter wind blow. I carry a 4 foot level, a tape, spray paint, and a story or two about close calls. A quick walk saves rework later.
Here is a compact site assessment I use on day PVC fence company one:
- Measure opening between fixed structures, then map the approach path for the widest vehicle. Note minimum curb-to-hinge distance.
- Check driveway slope both parallel and perpendicular to the fence line.
- Identify utilities, irrigation, and cleanouts. Probe for shallow lines near post locations.
- Watch wind patterns and exposure. Solid infill in a gusty corridor needs extra structure.
- Confirm code, HOA rules, easements, and setbacks that can pinch width or height.
If that list yields any red flags, solve them on paper first. Shifting a post 12 inches, cutting a small radius on the concrete edge, or raising a center stop a half inch can turn a tough entry into an easy one.
Width, clearance, and the geometry that keeps you out of trouble
Nominal widths lie. A 12 foot gate never gives a full 144 inches once you add hinge offsets, leaves that swing in an arc, and posts that lean inward a hair. For typical pickups and utility trailers on straight approaches, 12 feet often works. For RVs with a tight turn from a narrow street, 14 to 16 feet is more forgiving. I have opened RV gates to 18 feet on rural lots where snow berms pinch the approach in winter.
Think in terms of three numbers:
- Clear opening, post face to post face.
- Effective swing angle, how far each leaf opens before the trailing edge hits something.
- Set-back, the distance from the street or alley to the hinge line.
If you must keep the opening to 12 feet but the approach is oblique, bias the leaves. Make one 8 feet and the other 4 feet. The small leaf can be the daily driver for yard access. The large leaf opens only when local fencing Melbourne the rig rolls in. Fencing Installers and builders who work with tow drivers use this trick often because it buys turning clearance without moving utilities.
Posts and footings that do not blink
Posts are the foundation. A 7 foot tall, 6 foot wide leaf with semi-private infill can load a hinge post with hundreds of foot-pounds of torque under a modest wind. If the soil is soft or the post is undersized, that torque shows up as slow, permanent lean.
I prefer steel hinge posts for heavy leaves, even inside wood fences. A common recipe that survives time:
- For leaves up to 6 feet wide and 6 feet tall with open pickets, a 3 inch schedule 40 steel post set at least 36 inches deep often suffices in firm soils.
- For 7 to 8 foot leaves or solid infill, step up to 4 inch schedule 40 or 4x4x1/4 inch steel tube. In frost zones, set the footing below frost depth. That can mean 42 to 60 inches.
- For coastal wind or tall privacy, use 6x6x1/4 inch tube or 6 inch pipe. Overbuild here and sleep well.
Footings work best as bell or flared bottoms, not straight cylinders. I pour a 20 to 24 inch diameter bell at the base when space allows, then taper to a 12 inch neck. Add two pieces of rebar that tie the bell to the neck so uplift forces have to fight the cage. Set hinge posts dead plumb. Shim with gravel at the base before the pour to set drain. Crown the top of the footing so water sheds away from the post.
Wood posts can support light double-drives, but they need heft. A true 6x6, not a 4x6, with a steel hinge plate through-bolted, will last longer than surface-mount strap hinges on a 4x4. Many Fence Installers who prefer wood still sleeve their hinge posts with steel or bolt steel flitch plates to the gate face. Hybrids win.
Frames that resist sag
A gate leaf wants to sag at the latch side. The cure is a rigid rectangle and a predictable load path. Welded steel frames handle this best. For midweight leaves, 1.5x1.5x1/8 inch square tube works well. Step to 2x2x1/8 or 2x2x3/16 when spans or wind increase. Break long faces into triangles with either a horizontal mid-rail or a diagonal brace from the lower hinge corner to the upper latch corner. If you must use wood, build a double-rail stile and tie the diagonal with a turnbuckle truss rod so you can tweak tension after the first season.
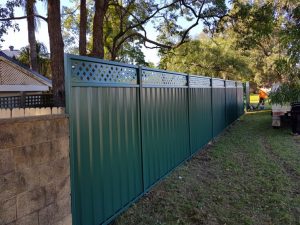
When applying wood infill to steel, fasten through slotted holes or use structural screws with neoprene washers. Wood grows and shrinks. Allow it to move so it does not tear fasteners or twist the frame. Use a breathable finish. I have seen cedar slats cup hard on the west face while the east leaf stays straight, which forces a stagger at the meeting edge. Slotted fastening keeps that manageable.
Powder coating is worth the budget for steel frames, but only over proper prep and zinc-rich primer or galvanization. In coastal zip codes, galvanize first, then powder. If you skip galvanization near salt, plan to repaint in 5 to 7 years.
Hinges and why adjustability is your friend
Hinges need three things: load rating, alignment, and serviceability. Barrel hinges with grease fittings are simple and strong. Adjustable gudgeon and strap systems let you correct for seasonal movement. Heavy bolt-on hinges with eccentric cams can fine-tune both plumb and in-out offset, which matters when your fence plane is not perfect.
Set hinge pins perfectly plumb with each other and aligned in the same vertical plane. That sounds obvious, but if the upper pin is 1/8 inch out from the lower, the leaf binds mid-swing. I set a laser line on the hinge axis when the concrete is still green, then brace to that line until the pour cures. Check again before hanging the leaf.
RV owners appreciate hinges that swing past 90 degrees. On tight lots, a 110 to 120 degree opening lets a rig tuck closer to a side yard. Use butt stops or gate stops so wind does not slam the leaf into 130 degrees and tweak a hinge ear.
Latches, center stops, and drop rods that take abuse
Double-drive gates need reliable alignment at the meeting edge. A center stop set in concrete gives the leaves a home. I like a steel angle with a chamfered edge that tires can ride without chipping. Set the top 1/4 to 1/2 inch proud of the driveway if you need positive stop and the site does not get snow plow service. In snow country or where kids ride scooters, flush or near flush is kinder, but add a deeper receiver cup for the drop rod so the leaf still lands in the same spot.
Use at least one drop rod with a stout receiver, two on wide or heavy leaves. Pair that with a latch that resists rattle. Gravity latches rattle under wind. Consider a cane bolt receiver with a spring clip, supplemented by a keyed latch plate or a padlock hasp if security matters. Commercial Fencing Contractors often add a neoprene bumper on the meeting stiles so the leaves kiss without chatter.
Swing versus slide, and when cantilever wins
Swing gates are simple, cost less, and require less maintenance in clean, flat yards. They stumble on uphill grades. If the driveway rises into the yard, the leaf needs clearance at the latch side. That increases bottom gap, which can look odd and invites pets to squeeze. You can cut the gate bottom to follow the slope, hinge the leaf higher and add a drop plate, or build a rising-hinge mechanism that lifts as it opens. Rising hinges work, though they load the post and people feel the weight as they push.
Sliding gates shine when space is tight or the driveway is steep. Ground-track sliders roll on a steel angle set level across the drive. They hate gravel, snow, and ice. In those climates, use cantilever sliders with counterbalance and rollers mounted on posts. Plan for the tail length. A 16 foot clear opening may need 24 feet of overall track length to fit the counterweight section. If you do not have that run of fence, sliding may not be an option.
For RV yards with reliable snow clearing and a level apron, a V-track or inverted angle track with sealed rollers can hold up. If neighbors track pea gravel onto security fence company your apron, prepare to clean the track often or choose swing.
Slopes, reveals, and hinge geometry on imperfect driveways
The steepest fights happen on sloped approaches. Small mistakes in hinge height and reveal add up. A few tricks from the field:
- If the driveway rises into the yard, set the hinge pins low and the latch side high to maximize clearance at mid-swing. You can gain an inch without changing the overall top line by letting the leaf sit 3/8 inch higher at the latch side.
- Bevel the bottom rail to match the driveway grade over the last 12 inches. That keeps the visual line tidy while stealing a half inch where it counts.
- Plan the swing path with chalk arcs. Mark where the lowest point of the leaf travels. Rise at mid-swing is the killer. Build to that arc, not to the open or closed position alone.
One memorable job had a 14 foot double-drive over a driveway that rose 3 inches across the opening and another 2 inches in the first 5 feet inside the yard. We solved it with uneven leaves, a mild bevel, and hinges set 3/8 inch higher on the uphill leaf. It looked natural, cleared easily, and spared the owners a daily grind.
Wind, privacy, and the sail effect
Solid or near solid infill looks clean, hides yard clutter, and gives privacy, but it behaves like a sail. If your site catches a prevailing breeze, do not cheat on posts, frames, or hinges. Consider air gaps. Even 20 to 30 percent open area can halve wind load. Options include spaced boards, louvered panels, perforated steel, or decorative screens with cutouts.
In gusty corridors, add hold-open hardware. A simple magnetic catch on each inside fence face or a recessed pit stop for the drop rods will prevent a surprise slam. I have replaced too many latch receivers bent by a single windy day.
Automation that is reliable, not finicky
Automating double-drive and RV gates can be smooth and safe if you plan for it from day one. There are two broad categories for swing gates: linear arm actuators and pad-mounted articulating operators. Linear arms mount to the post and gate leaf. They are compact, common for residential jobs, and can run on solar if the duty fencing contractors cycle is light. Pad-mounts offer more muscle and smoother motion for heavy leaves.
Key considerations:
- Power and conduit routing. Run a dedicated circuit with surge protection. In cold climates, plan for battery warming or house the control in a non-freezing space.
- Safety devices. Photo eyes and edge sensors are not optional when vehicles, kids, and pets share space. Inductive loops embedded in the drive provide reliable vehicle detection and close control.
- Manual release that makes sense. When a storm knocks power out, the owner should be able to unlock and swing the gate without tools. Test that hand swing before you leave the site.
- Syncing leaves. Dual operators must close together or the latch will fight them. Good controls allow soft close sequencing. Without sequencing, the first leaf to touch the latch stops early and the other leaf hits it hard.
Solar can work, but be honest about usage. An RV yard that opens twice a day is fine. A busy side driveway that cycles every 10 minutes during morning rush will starve on winter days in northern latitudes.
Security and access the fire department will respect
A strong gate is only as good as its weakest habit. Many homeowners leave one leaf unlatched because the latch is awkward. Design for daily use, not perfect conditions. Place the latch where you can reach from inside the yard without leaning into traffic. If the gate is automated, integrate a keypad on both sides where reachable from a truck window.
Talk to the local fire department. In many cities they require a Knox lock or a specific dual-lock setup. Fencing Contractors who work commercial sites know the drill, but residential Fence Installers sometimes skip this step. It costs little to do right and can save the owner a fine or a broken latch during an emergency.
Permits, HOA rules, and easements that can bite late
Setbacks can shave inches off your dream width. Utility easements can forbid concrete where you planned a center stop. Some HOAs cap gate height at 6 feet even if the fence is taller, or require matching materials. Pull the plat, call 811, and, if needed, submit an HOA sketch with exact dimensions, materials, and color. Fencing Builders who document early avoid change orders later.
A clean build sequence that hits the mark
Here is the streamlined sequence my crew uses to keep quality high and surprises low:
- Stake the opening, verify width with the client’s largest vehicle on site if possible, and paint the swing arcs on the driveway.
- Set hinge and latch posts true with bell footings below frost, line the hinge axis with laser, and cure.
- Fabricate or fit frames to measured opening, dry hang with temporary shims, and adjust hinges until leaves land on the center stop perfectly.
- Add infill, latches, drop rods, and stops, then test under wind and hand force. Only after smooth swing do we core drill loops or mount operators.
- Finish with coatings, final grading at the posts, and client walk-through on operation, maintenance, and manual release.
That is the build that avoids later phone calls about rubbing or misalignment after the first thunderstorm.
Common mistakes and how to fix them before they spread
Undersized posts lead the mistake parade. I have been called to reinforce 4x4 posts holding 7 foot privacy leaves that shook like tuning forks. The cure was a steel post sistered on the inside fence line, tied with through-bolts and a new hinge plate. Not cheap, but cheaper than rebuilding.
Another frequent miss is the center stop set too low. Tires beat it down and the leaves start kissing high and fanning at the bottom. Set the stop higher at first, then adjust after a week as the concrete shrinks and the leaves settle. Use a receiver that gives you adjustment wiggle.
Rust blooms under powder coat are usually prep sins. If you see orange seams at year two, strip the latch-side verticals and refinish with zinc primer and a compatible topcoat. Small interventions stop big failures.
On slopes, I often see bottom gaps too tight at mid-swing. The fix is painful if the gate is already coated. A smart grinder, a neat bevel, and a matching touch-up can hide the surgery. Better to map the arc with chalk ahead of time.
RV specifics that separate a good gate from a stress point
RVs have longer wheelbases and wider mirrors. The tow ball or fifth wheel pin sets the pivot deep under the front cap. That creates off-tracking. In practice, the rear wheels cut inside the front wheels by a foot or more on tight turns. Allow both width and depth. Set the hinge line back from the sidewalk if possible, even 12 to 24 inches, so the rig can straighten slightly before the leaves narrow the path.
Mind vertical clearance at the latch edge for rooftop accessories. A 7 foot tall gate is visually tidy, but a ladder, A/C shroud, or satellite dome can sit higher than expected when the driveway crowns. Measure the tallest point of the RV on the same tire inflation and load condition it will use at home.
Think about utilities. Many RV owners add a 30 or 50 amp plug and a sewer cleanout near the parking pad. Do not block those with a center stop or a deep drop rod receiver. Run conduit for future lighting or cameras while you are trenching. A simple LED strip under the top rail on the yard side makes night backing surprisingly easier.
Finally, test the approach with something physical. If the client cannot bring the RV, set tall cones or a string line at mirror width and walk a mock turn. You will catch the weird corner before metal meets metal.
Materials, looks, and how to blend strength with style
Wood and steel hybrids win for many homes. A welded steel skeleton gives stiffness. Cedar or composite slats deliver the look. Leave 1/2 inch airflow gaps for wind relief and thermal movement. For modern homes, powder coated aluminum frames with horizontal slats keep weight down and resist corrosion. Aluminum hinges different than steel hinges, so use compatible hardware and add dielectric barriers where stainless fasteners meet aluminum frames.
If you want full privacy without a sail, look at semi-perforated steel panels or battens set at alternating angles. You can achieve 70 to 80 percent visual block while letting wind leak through. Fencing Builder teams who coordinate with landscape designers often dial in these patterns to complement the house.
Hardware finish matters. In coastal regions, use 316 stainless where you can, or hot-dipped galvanized straps and bolts with isolators. Inland, zinc-plated grade 5 hardware holds up, but always isolate dissimilar metals. A nylon washer can save a powder coat edge from galvanic creep.
Maintenance that keeps swing true
Gates move. Bolts lose a quarter turn as wood seasons and as hinges cycle. Schedule a spring check. Grease zerks until fresh grease shows. Tighten hinge plate bolts. Inspect welds for hairline cracks at latch receivers. Replace drop rod bushings when holes wallow. Brush dirt out of ground tracks. Rinse salt splash off steel at the end of winter. A 30 minute ritual once or twice a year prevents 3 hour service calls.
Teach owners to listen. A squeak that shows up on windy days and disappears in calm often points to a hinge bushing drying out or misalignment making a hinge fight the arc. Latches that start to stick on hot afternoons might be expanding metal meeting a too-tight receiver. A file pass and a shot of dry lube calm that down.
Budgets and timelines that make sense
Costs vary by region and spec, but useful ranges help planning. A basic 12 foot double-drive, steel frame with wood infill, manual hardware, and solid posts often totals in the mid four figures. Step up to 14 to 16 feet, heavier frames, and premium coatings, and you are in the high four to low five figures. Add dual swing operators, loops, and access control, and budgets climb another several thousand. Fencing Contractors who share ranges early help clients align design with reality.
Timelines run from a few days to a few weeks. Concrete needs cure time. Powder coaters have queues. Utility locates can take a week. A realistic schedule prevents rushing the hinge set, which is where errors creep in. Many Fence Installers will set posts on week one, fabricate during cure, then hang, finish, and automate in week two.
A few field notes to close the loop
Years ago, we built a 16 foot RV gate on a corner lot with a narrow alley. The owners were nervous about backing. We widened only to 14 feet due to a utility easement, but we shifted the hinge line 18 inches into the yard, biased the leaves 10 plus 4, and cut a small radius in the concrete at the inside corner. They rolled a 36 foot fifth wheel in on the first try. Geometry beat brute width.
Another project sat on a windy ridge. The owner wanted a full privacy, board-on-board design. We pushed back, proposed a louver with a 60 percent block, upsized the hinge posts to 4 inch schedule 40, and added magnetic hold-opens. That gate rides out 40 mph gusts without drama. The neighbor’s solid panel across the street has replaced latches twice.
These are not one-size jobs. You read the site, read the people, and choose the right mix of structure, hardware, and habit. That is the craft. Fence builders who approach double-drive and RV gates with a bridge builder’s mindset deliver quiet, repeatable performance. Homeowners feel that each time the leaves swing back to meet and land like a door on a well-hung hinge.
Whether you hire a Fencing Contractor, a local Fence builder with a welding rig, or a team of Fencing Installers who bring both carpentry and steel skills, the principles hold. Strong posts below frost, frames with triangulation, hinges set on a true axis, latches that land, and clear thinking about slope and wind. Do that, and your gate will not just look good on day one, it will behave on day one thousand.