Step-by-Step Pathway Paving Installation with Interlocking Pavers for a Safe, Fashionable Course 78088
A well built sidewalk really feels great underfoot. It overviews visitors, maintains footwear completely dry in a storm, and ties the architecture of a home to the landscape. Interlacing pavers hit a wonderful area for this kind of course. They drain well, manage freeze and thaw cycles, and can be lifted and reset if you ever need to get to an energy line. I have restored loads of poured concrete strolls that cracked or tilted. I have actually hardly ever been called back to repair an interlocking pathway that had a proper base under it.
This guide goes through the craft, from design and excavation to compaction and joint sand. It leans on area experience as opposed to concept. You will certainly see particular dimensions, actual tools, and judgment calls that different a sturdy, safe course from one that looks tired after a single winter.
Start with the route, not the stone
Every strong sidewalk design starts with a function. Where do feet actually travel on your residential or commercial property, and what challenges compel detours? Stroll it a couple of times. If the turf informs you people reduced a corner, respect that arc. Sharp angles look cool on an illustration however motivate individuals to step onto dirt at the inside corner, which roughs up sides and expands mud.
Width issues. A comfy domestic walkway is in between 36 and 48 inches clear, gauged in between solid sides. Narrower courses really feel mean and cause individuals to enter your beds. Go wider near driveways, doors, and locations where people pass each other, or where you expect rolling bins or baby strollers. If you plan landscape lighting or tall growing, offer it area so vegetation does not crowd the stroll after a season of growth.
Curves ought to make their keep. Long, careless arcs look all-natural and ease snow shoveling. Limited S curves create lots of cuts and maintenance. If you need a contour, keep the radius to at the very least 6 feet unless you have pavers specifically created tight arcs.
Slope and drainage, the silent essentials
Water is both the close friend and the adversary of pavement. You want it to take a trip through the joints and into the base, after that continue away from the framework without spending time. For a pathway beside a residence, pitch the surface area 1 to 2 percent far from the foundation. That is a decrease of around 1/8 to 1/4 inch per foot of run. Over a 4 foot wide path, that is an overall decline of 1/2 to 1 inch. A slight cross incline is enough to move water and still really feel level to your feet.
Pay interest to the surface listed below. If the subgrade currently leans toward your house, solution that first. Do not rely on the thin bed linens layer to correct significant slope mistakes. If you are going across a downspout path or a natural swale, intend a means to keep that water from diving under your new base. A tight side restraint on the low side helps, but in some cases you require a small catch container, a completely dry well, or a 4 inch drainpipe line with daytime. These things are much easier to establish prior to you gather stone.
For accessibility, long walks need to avoid inclines steeper than 5 percent. Much shorter ramps can be steeper yet maintain transitions mild. Think about winter season too. A shaded north side that freezes in January ought to have a texture and joint that offer grip, not a slick, rolled confront with polished joint sand.
Materials that support the system
Interlocking pavers are only like the layers listed below. The stack, from upside down, looks like this: native soil subgrade, optional geotextile fabric, compacted base aggregate, bed linens sand, pavers, joint sand. Edge restraints hold the sides.
Aggregate makes the structure. Look for a well rated, angular mix often offered as 3/4 inch minus or dense graded aggregate. It locks up when compressed. Spherical river stone does not. For sidewalks on good, uninterrupted soil, I go for 4 to 6 inches of compacted base aggregate. On clay, increase that to 8 inches or more and lay a woven geotextile in between the soil and base so fines do not inflate into your rock. In frost susceptible areas, even more base deepness plus water drainage maintains heave in check.
Bedding sand is not play area sand. Use concrete sand, a crude, sharp sand that compacts and drains pipes however does not wash out quickly. Screed it to regarding 1 inch, after that do not stroll on it. Fine tune with a trowel and set your pavers.
For joint sand, typical completely dry move sand works well if you maintain it. Polymeric sand solidifies when wet and resists wash out and weeds, however it needs regimented installation and dry weather for activation. Both are fine choices when made use of properly.
Pavers can be found in several shapes, appearances, and thicknesses. For Walkway Paving Installation, 60 millimeter density is typical. If you may ever before transform the course to bring an automobile, or if the stroll shares fill with a vehicle parking edge, make use of 80 millimeter pavers and a much deeper base. Save light-weight 40 millimeter tiles for patio areas on slabs, not for structural work on soil.
If you are contrasting to Driveway Paving Setup, remember automobiles transform the policies. Driveways need a minimum of 8 to 12 inches of compressed base and 80 millimeter pavers, and patterns that interlock in multiple instructions. A walkway can be lighter, but you still layout for freeze, water, and time.
Tools and materials that make the work go faster
- Plate compactor with a contoured pad, string line and risks, a 4 foot level or laser, and a rubber mallet
- 3/ 4 inch minus base aggregate, concrete sand for bedding, and joint sand or polymeric sand
- Woven geotextile material sized to the trench size, if dirt is soft or clay heavy
- Edge restraints with 10 inch spikes or a concrete toe, plus a paver splitter or damp saw with a diamond blade
- Screed rails or pipes, a straight screed board, shovel, rake, and a wheelbarrow
Layout on the ground, not just on paper
Put your design on the site with stakes and string. Set string lines for both sides of the walk at ended up height and incline. A tight string informs you where cuts start and where you require fill. For contours, lay a yard hose pipe along the path and change up until the circulation feels right. Usage marking brick paver installation contractors paint to map the edges. Action sizes at normal periods so both sides stay parallel unless the design flares.
Before you touch a shovel, ask for utility locates. In many regions, it is complimentary and saves lives. You do not want to penetrate a gas line with an excavating bar.
If your stroll connections right into steps, decks, or a driveway, job in reverse from those repaired factors. The last program at each end ought to land cleanly, not on slivers. Change pattern and size around those constraints, not the other means around.
Excavation that appreciates the math
Excavation depth equals base depth plus bedding sand plus paver density. For a typical 60 millimeter paver on a 1 inch sand bed over 6 inches of base, that is roughly 9 inches from completed grade. Include a little extra where soil is soft so you can rebuild to the best altitude with top quality product instead of leave spongy dirt under your new work.
Cut the trench square and slightly wider than the finished pathway, typically 6 inches total extra so you have area for bordering and compaction. As you dig, set aside tidy topsoil for beds and separate it from subsoil and roots that you will certainly haul away. If you strike considerable origins, take into consideration rerouting instead of removing the tree's feeder systems. For tiny roots, tidy cuts with a saw beat rough rips from a bucket.
Once dug deep into, small the subgrade. A couple of passes with the plate compactor on a little moist dirt is enough on firm ground. If the plate jumps or the surface area waves, you have soft areas. Dig those out and replace with base aggregate in layers, after that small. The goal is uniform support, not a trampoline.
Proof roll the trench by strolling it heel to toe. If your heel sinks or the surface pumps water, remedy it prior to you go even more. It is a lot easier to deal with currently than after the pavers are laid.
Fabric and base that do the heavy lifting
If your soil is clay, silt, or otherwise unsteady, present woven geotextile fabric across the trench, overlapping joints by at the very least 12 inches. The material divides soil from base and protects against fines from migrating up, which maintains your base strong. Prevent nonwoven filter material here. Woven has the tensile stamina you desire under a pavement.
Place base accumulation in 2 to 3 inch lifts and compact each lift extensively prior to adding the next. Do not unload 6 inches and anticipate the compactor to compress it all the method with. You can really feel and listen to the modification when the rock locks. The plate's tone rises and the surface area stops relocating under the machine.
Check quality as you go. Utilize your string lines and a level or a laser to keep the fluctuate real. It is easy to add a bit extra rock than you need, then go after that blunder up into the sand bed. Take your time with base, due to the fact that everything above it mirrors whatever is below.
On long term, construct the cross incline into the base, not just the sand. Set the higher side of the sidewalk greater in base by the amount you planned for the surface area decrease. You will certainly screed alongside that slope later.
Screeding the bed linens layer
Set two right, inflexible screed rails parallel to the path and a hair under an inch listed below finished paver height. Steel pipe, light weight aluminum screed rails, or straight 2x lumber work when true. Put concrete sand in between them and pull a straight screed board along the rails to level the sand. Load hollows and pull once again until the sand is level and at the appropriate elevation.
Lift the rails out and fill the voids with sand, after that smooth delicately. Do not walk on the screeded bed. If you should go across, make use of broad boards to spread your weight. The bed linens layer is not a place to correct large height differences. If you are repairing greater than a quarter inch of error, quit and deal with the base. An even, consistent sand layer is what lets pavers seat and stay that way.
Laying patterns that lock
Most pathways take advantage of patterns that interlock in 2 directions. Running bond is very easy to lay, but it can telegram lots lines and drift gradually without great edges. Herringbone at 45 or 90 degrees resists creep, looks crisp, and spreads out load uniformly. Basketweave and modular patterns function when your dimensions match the modules.
Start from a directly, difficult edge, like your house foundation or a straight line established by string. Lay pavers carefully onto the sand, tight yet not required. Keep the face of the stone clean. Work off the newly laid pavers instead of stoop in the sand to avoid interrupting the bed. Usage stooping pads to shield your knees and the work.
Open multiple packages and pull from each. Color variation is an attribute of concrete pavers, not a defect. Blending maintains the mix all-natural. Building contractors that lay one pallet at once wind up with stripes they can not unsee.
Check placement every few training courses. A string across the tops keeps you straightforward. Adjust with a rubber club. Do not bar a paver right into location and leave a void under it. You can really feel hollow stones when you stroll on them later, and they rock with traffic.
Cutting to fit, easily and safely
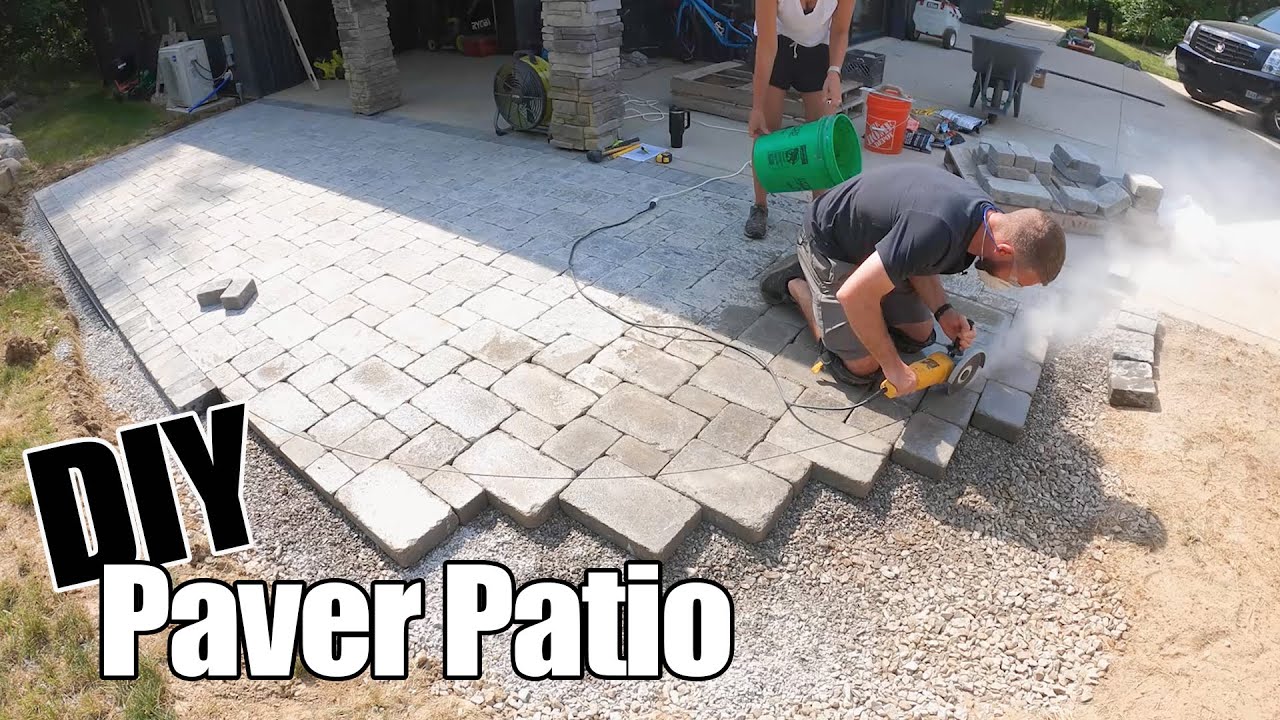
Where the path curves or fulfills a set edge, you will cut. A guillotine splitter makes fast, peaceful cuts on many pavers, leaving a harsh face that can look penalty at a garden side. For specific sides or dense concrete, a damp saw with a diamond blade gives you tidy kerfs.
Safety is not optional. Put on eye and ear protection, handwear covers, and a dirt mask or respirator. Silica dust is genuine. If you use a completely dry saw, established downwind and maintain others clear. Score your line first, then finish the cut. Support both sides to avoid side cracking. Mild rounding of sharp edges with a rock or a quick pass on the saw gets rid of a journey threat and looks finished.
Keep reduced items reasonably huge. Slivers at the edge look negative and bulge. If a cut returns a thin slice, readjust the previous courses to expand the item or change the pattern near the edge so you land on a stronger module.
Edging that holds the field
Edge restrictions protect against lateral creep. Plastic or aluminum bordering spiked into the base is basic and resilient when mounted appropriately. Establish the edging limited against the pavers, outside of the area, with spikes driven through preformed slots into the compressed base at 10 to 12 inch periods. If the dirt is soft or the contour is limited, tighten that spacing.
In some styles, paving-related drainage services a concrete toe works better. Trowel a narrow, reinforced band of concrete outside the last program, with the top simply below the paver side so it vanishes. Prevent burying straight 2x lumber as a side, it decays and launches the pavers in a couple of seasons.
Do not establish the side on the bed linen sand. It belongs on the stone base so the spikes attack into a company layer and the restriction holds during freeze and thaw cycles.
Compacting the field and filling joints
With the area laid and sides locked, move the surface area clean. Any kind of grit ground under the plate compactor can scrape the pavers. Fit a safety pad to the compactor and make a pass over the whole surface area. This very first compaction seats the pavers right into the sand and evens minor elevation distinctions. You can see the joints tighten as the lines close.
Sweep a completely dry joint sand into the joints until they are full and the sand sits slightly honored. Make another compaction pass to vibrate sand down, after that replenish. 2 or 3 cycles offer you complete joints. Reject every trace of sand from the surface.
For polymeric sand, reviewed the bag and follow it. Problems matter. The pavers have to be bone dry prior to you sweep it in, then you should get rid of every grain from the face, then mist exactly as routed. Too much water washes out the binders, insufficient leaves a weak crust. Stay clear of wind, rain, and dew throughout activation windows.
Safety information that settle in everyday use
- Keep the joint width consistent, ideally 2 to 4 millimeters, to balance water drainage with heel convenience and walking stick stability
- Use a texture with grip and stay clear of high polish near slopes or shaded locations that ice up in winter
- Integrate reduced voltage illumination or solar markers where steps, transforms, or grade changes occur
- Ease shifts at limits with a tiny bevel so wheels and toes do not catch
Trip dangers rarely come from one large mistake. They originate from lots of tiny ones, a lip below, a void there, a dark corner. Walk the completed path at sundown and in rain. Fix what you notice.
Common mistakes and just how to fix them
Shallow base is the traditional failure. The surface looks best for a month, after that low areas appear after a storm. If you can shake a straightedge on the course, you require to lift that area, get rid of sand and some base, restore with far better compaction, and relay. It bores, but the modular nature of pavers makes it possible.
Poor drainage reveals as wet joints that never ever completely dry or ice sheets in winter months. If your slope is ideal and the base still holds water, you might require a drainpipe line or a more open graded base in problematic zones. In clay, consider a perforated pipeline covered in textile along the low side, tied to daylight.
Edge creep begins when plastic edging is spiked into sand, not stone, or when spikes are too much apart. If the side bows, pull it, include base and compaction at the edge, and re-install with tighter spacing. In hot climates, cheap bordering can soften and deform. Make use of an inflexible profile rated for your temperature swings.
Efflorescence, the white blossom that can show up on concrete pavers, is cosmetic and normally fades. Cleaning with a light acid cleaner, conserved and washed extensively, speeds the process. Sealers can decrease it, but securing is a separate choice based on web traffic, aesthetic appeals, and maintenance appetite.
Weeds in joints are generally wind blown seeds, not plants growing up from below. Full, compacted joints leave little area for seeds to root. When they appear, pull them early, rebrush sand as required, and think about polymeric sand if upkeep really feels heavy.
Maintenance that prolongs the life of the path
Interlocking pavers request for moderate care. Sweep grit off so it does not function as sandpaper. Wash after deicing season. Choose calcium magnesium acetate or sand in winter as opposed to rock salt if your pavers' producer discourages chloride salts. If a joint erodes, add dry sand and shake it in. Anticipate to retouch joints yearly or 2 in high web traffic or revealed outdoor kitchen installation design locations.
Sealing is optional. A breathable sealant can deepen color and slow discoloration. It likewise changes the surface area rubbing and might make winter months slipperier. Attempt a small test area first. A lot of homeowners that secure do it every 3 to 5 years, depending upon sun and traffic.
If an area settles, do not deal with it. Draw the pavers, include or adjust base and sand, and relay. A 2 person team can lift, deal with, and reset a 10 square foot patch in an hour. That utility is why lots of pros and communities prefer pavers over monolithic slabs.
Budget, timing, and what to expect
Material costs differ by area, however a top quality paver sidewalk usually runs 12 to 25 dollars per square foot for products when you consist of base rock, sand, edging, and the stone itself. Device leasing, disposal, and distribution add a few hundred bucks. A plate compactor leasing can be 60 to 100 bucks daily. Professional installation varies extensively, frequently 25 to 45 bucks per square foot for sidewalks with curves and cutting.
A convenient house owner with one helper can complete a 100 square foot straight walkway over two weekend breaks if weather condition works together. Contours, steps, and water drainage functions add time. The concealed time sink is relocating product. A solitary cubic lawn of base rock considers about 2,400 to 3,000 pounds. Strategy your hosting so you are not pushing a wheelbarrow uphill all day.
From sidewalk craft to driveway duty
Many information rollover from Sidewalk Paving Installment to Driveway Paving Setup, but tons change the engineering. For driveways, use 80 millimeter thick pavers, set a herringbone pattern for multidirectional lock, and double your base deepness. Take into consideration open rated base layers with clear stone and a choker course for water drainage under rush hour, especially in freeze and thaw climates. Side restrictions require more bite and should be tied into the base aggressively. Shifts at the street need mindful interest so rake blades do not choose edges in winter.
The flip side is that lessons from driveway job, like disciplined compaction and slope control, make a pathway last much longer. Bring that frame of mind to your course and it will feel strong for decades.
An area instance, straight from the dirt
A customer in a 1950s area had a directly, split concrete walk that constantly held a pool near the deck. The lawn sloped toward your home, and the downspout discarded right beside the walk. We created a mild S contour that expanded near the driveway, set at a 1.5 percent cross incline away from the structure. The dirt was a heavy clay, so we excavated to 10 inches below coating, laid a woven geotextile, and developed back with 8 inches of thick rated accumulation in compacted lifts. A 4 inch drain line, covered in textile, carried the downspout under the stroll to daylight by the curb.
We picked a tumbled 60 millimeter paver in a 45 degree herringbone pattern to handle wheeled containers without drift. Aluminum bordering with 10 inch spikes at 10 inch spacing held the arcs. Screeding the bedding sand took patience around the contour, so we utilized adaptable PVC conduit as screed rails, curved to match the format. After laying, compacting, and jointing with polymeric sand on a completely dry day, the walk rode smooth. The next spring, after a late ice tornado, the customer texted a picture. No puddle, no heave, and a paper on the deck that remained dry for the first time in years. The aesthetic charm boost was a bonus offer, but the quiet success were incline, base, and drainage.
Final checks before you call it done
Before you placed the tools away, walk the path slowly with a degree and a keen eye. Look for pleased sides you could catch with a shovel in winter. Examine that the cross slope is present lengthwise, that downspouts are rerouted, and that compost or dirt is not above the paver side where it could wash into joints. Hose it gently and enjoy exactly how water acts. You should see a thin sheet drift away from your house and joints sip water without bubbling.
If you deal with the walkway as a tiny piece of civil design as opposed to simply an ornamental band, it will function as both a safe course and a handsome aspect in the landscape. Interlacing pavers compensate careful prep, consistent compaction, and interest to edges. Construct those right, and style options end up being the enjoyable part.