Homemade Water Park Ideas: Waterfall Splash Pad
Water play has a way of turning a backyard into a mini resort, a place where mess becomes memory and every shout of delight signals a small victory of ingenuity. We built our first splash pad not in a grand suburban lot but in a narrow, sun-scorched side yard that begged for a cooling distraction. The result wasn’t a glossy commercial installation, but a practical, affordable setup that gave kids a sense of wonder and adults a chance to unwind without leaving home. A waterfall splash pad—or more broadly, a DIY water park at home—has to earn its keep in real life: it must be safe, durable, simple enough to repair, and flexible enough to grow with your family’s needs. The waterfall concept is a natural anchor for that mix. Water tumbles over a ledge, creating a soft curtain of water and a sound track that says, in effect, welcome to real summer.
In this piece, I’ll walk you through the concrete steps I learned through trial and error, the decisions that save time and money, and the little design details that transform a basic splash zone into a true water park feature. I’ll share practical scales, budgets, and the kinds of mistakes that send you to the hardware store again and again. You’ll find a tested approach to building a waterfall splash pad, plus alternatives that suit different yards, climates, and families. I’ll keep the focus on things you can achieve with reasonable effort, appropriate tools, and a clear sense of risk and reward.
A backyard water feature can feel magical, especially when kids run toward it with bare feet and laughter. The trick is to balance play value with responsible maintenance. The best splash pads feel like a natural extension of your outdoor living space rather than a flashy add-on. They should be intuitive to operate, easy to rinse and dry after use, and sturdy enough to weather inevitable roughhousing without slipping into maintenance headaches. A waterfall splash pad offers a particular advantage: the water appears in motion, it travels from height to ground, and the sound and sight of falling water create that immersive water-park vibe. With the right planning, it can be both a weekend project and a long-term feature that keeps paying back its initial investment in joy.
First, let’s anchor the idea in real-world constraints. Most families want something that is safe for small children, relatively economical to install, and easy to maintain through a humid season when algae and mineral buildup can become a problem. The concept of a waterfall splash pad is essentially a splash pad with a small, recirculating stream that pours over a ledge or a man-made “stone” that creates the waterfall effect. The design can be as simple as a plastic or concrete basin with a raised lip that spills into a shallow, padded play space, or as elaborate as a compact modular pool fed by a pump and filtration system. The core idea is to create a microenvironment where the water is always moving, never pooling in a way that invites slipping, and always returning through a loop that keeps the water clean enough to touch and drink (in a cautious, non-consumptive sense).
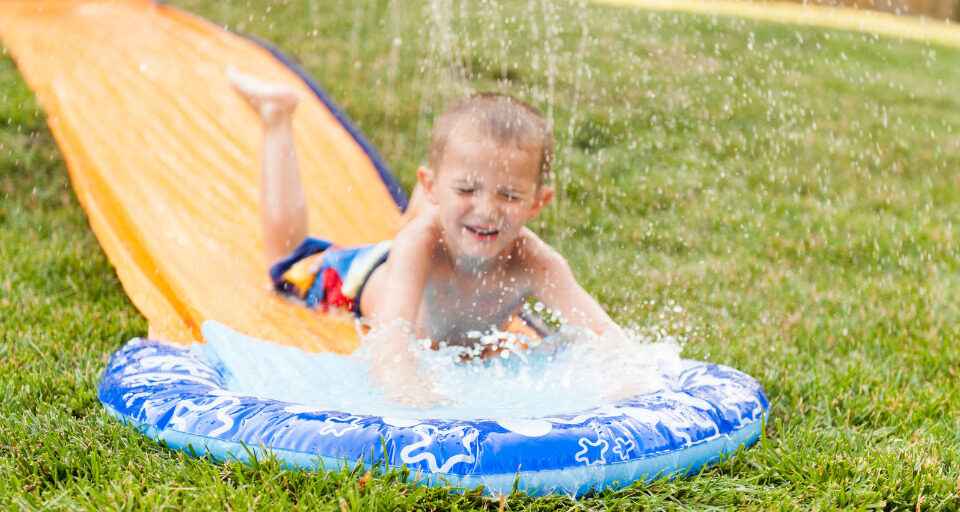
In my own setup, we started with a basic rectangular pad tucked between the house and a fence. It reused an old above-ground pool liner to form a basin, a small pump that circulated the water, and a curb-like edge that acted as the waterfall lip. The first season taught a handful of hard truths: a waterfall must be properly aligned with the surface slope to avoid puddling, and the edge around the spillway has to be rounded and smooth enough to prevent injuries. We learned to mask the noise of the pump with a small rock garden and to route cables underground to keep curious hands from grabbing cords. The compact, low-profile design meant the device stayed off the radar as a fancy installation and became a practical feature you could show off at a neighborhood barbecue.
The beauty of a waterfall splash pad is that it scales. If you have a small yard, you can build a compact cascade using a single vertical lip and a shallow basin. water park ideas If you’re lucky enough to have space, you can expand to multiple spillways, a larger basin, and a little “pond” area that doubles as a place for float toys to rest. My own approach was to treat the project in stages, aligning the order of operations to the weather, the height we could safely achieve, and the number of kids I expected in a given weekend. Each stage delivered a new layer of play value and a new layer of responsibility, from precisely cutting the spill lip to ensuring that hoses and connectors didn’t pose tripping hazards for running feet.
The practical questions begin with what materials to choose and how to assemble them into something that looks intentional rather than cobbled together. A waterfall splash pad is a circuit that must be designed with safety, reliability, and maintenance in mind. You want a surface that drains promptly after use, a spill lip that doesn’t snag small toes, and a recirculation loop that minimizes waste and avoids stagnant pockets, which breed algae and unpleasant odors in hot weather. The water needs to be clean enough to touch, even if it isn’t meant for drinking. That means choosing a filtration approach that fits your scale and a pump that can handle continuous operation for a few hours at a stretch without overheating. It’s a balancing act between power draw, reliability, and the risk of leaks at joints and seals.
A good rule of thumb for a waterfall splash pad in a typical suburban yard is to start with a 40 to 60 gallon basin for the spill area, and to pair it with a small pump, ideally one rated for continuous run. If you have a larger space or a higher water table, you can move to a 100 gallon basin and a more robust filter. The key is to design around a simple, closed loop that preserves water and reduces the need for frequent refills. We ran into a friction point when the initial layout depended on a shallow sloped ground that didn’t drain quickly enough after the pump turned off. The fix was to add a gentle slope away from the pad and a shallow gravel channel that helps with quick drying. It seems obvious in retrospect, but it’s a detail that makes the difference between a paddling pool that feels thoughtful and a puddle that invites mud and a slippery fall.
With that setup in mind, here is a grounded, practical sequence you can adapt to your space. Start by choosing the location. Look for a level or gently sloping area that can hold a drainage run-off to keep the water within the device and away from foundations. Avoid placing the pad where lawn runoff or irrigation lines cross or where the sun makes hot, drying cycles harsh on the liner. Mark the footprint for the basin and the spill lip. The lip should be at least the width of your palm higher than the basin, so that water travels outward rather than directly down into the surface. A curved spill lip is friendlier on toes than a sharp edge. Then plan the water loop. A compact pump in the 200 to 500 gallons per hour range often handles a modest splash pad, especially if you keep the spill area fairly shallow. Add a basic filter compatible with the pump capacity, and an inline strainer to catch hair and leaves if you’re using the space regularly.
There is a practical psychological lesson in the layout as well. People don’t want to be shown a complicated gadget and told to press here or flip that switch. The best waterfall splash pads feel almost self-regulating. The water should appear to cascade in a natural way, even if the mechanism is entirely artificial. A simple, visible spill lip helps kids understand how to “play the waterfall.” If the water is too quiet, kids lean in and demand more. If it’s too loud or too turbulent, they back away. The sweet spot is a soft curtain every so often, with bursts when they stir up the likes of a little whirlpool behind the lip. The design philosophy here is to aim for a feature that invites discovery, rewards experimentation, and remains forgiving of missteps.
One of the most important but often overlooked aspects is the surface around the pad. A well-chosen ground cover can reduce friction injuries and make maintenance easier. Rubber matting, interlocking foam tiles, or even a thick layer of outdoor-rated astro turf can provide a softer landing for littler feet. The trade-off is that softer surfaces can retain moisture and produce mold if not dried out regularly. The solution is simple: ensure the area drains well and that you can blow or wipe the surface dry after each use. An outdoor fan or a quick-dry feature near the water zone can dramatically reduce dampness and keep the play area comfortable for the next round.
If you are reading this and thinking about cost, you’re not alone. A waterfall splash pad can be surprisingly affordable if you approach it with patience and a clear plan. The biggest expenses usually fall into three buckets: the basin, the pump and filtration, and the spill lip architecture. A mid-range setup might run a few hundred dollars for a compact system, with costs climbing as you scale the footprint or add features such as motion-activated spray patterns, a larger reservoir, or ornamental stones. The good news is that every dollar spent on durability pays off in fewer repairs and less downtime. A durable liner, a weatherproof pump, and a robust sealant tend to be the quiet winners in the budget column. It’s the kind of purchase where you realize the value not merely in how much water looks good, but in how little maintenance you perform on a month-to-month basis.
The social side of a water park at home is also worth mentioning. A waterfall splash pad invites a rhythm to summer that a typical pool does not. You watch kids get excited by the first trickle and then launch into a cascade of games that you didn’t plan for. It’s not unusual to find them staging a water race, a small obstacle course, or a pretend “waterfall safari” where they attempt to navigate a path without losing balance. The play value multiplies when you coincide it with a few simple, reusable props such as floating ducks, waterproof hoops, or a handful of shaded towels that can double as comfort during a break. The social dynamic matters because it’s a test of the design in real time: do kids have space to play, do parents feel comfortable stepping back to let them explore, and do the safety measures hold up under the heat of a busy afternoon?
Now let’s describe a practical approach to building, step by step, with enough detail that you can start drawing up your own plan. First, you need to determine your scale. A 4-foot by 6-foot pad is a minimal starting point if you’re dealing with a handful of children. A 6 by 10 or larger area works better for larger families or for adult supervision while the kids explore. The spill lip height is best kept around 2.5 to 3 inches, and the water depth in the basin should hover around 1 to 2 inches for safety. This ensures kids can move through the space without becoming fully submerged. The lip itself can be formed using a sturdy, moisture-resistant board or a pre-milled concrete or stone feature. The exact material will depend on your climate, available tools, and personal preference. The crucial factor is that the lip should be smooth, rounded, and securely anchored to prevent any movement that could injure the feet.
Next comes the plumbing. A small pump with a built-in thermal cutoff is ideal, as it reduces the risk of overheating in hot weather. The filter should be sized to handle the volume of water in your basin; for a tiny pad, a cartridge filter lives happily alongside a modest pump. In most setups, the return line will feed the spill lip in a way that ensures consistent cascading water. You’ll want quick-release hose connectors so you can detach parts for cleaning without making a mess, and you’ll want to keep electrical outlets and cords well away from any splash area. It’s easy to underestimate the heat of a summer afternoon and the impulse to plug in the pump near a favorite play zone. A shallow, dedicated outdoor outlet with a GFCI breaker is worth the investment for peace of mind and reliability.
The maintenance loop is where the real discipline comes in. A weekly inspection is not dramatic; you’re simply checking for leaks, cleaning the filter, and ensuring the spill lip remains rounded and intact. If you notice water is not draining as quickly as it should, it’s a sign the surface has softened or the drainage path is clogged. Small blockages from grass or leaves are easy to clear with a flexible tubing tool. The goal is continuous circulation without hard edges where sediment can settle. If you’re in a climate with heavy mineral content, you might consider a small, periodic mineral treatment or a lightweight, non-corrosive algaecide. Use only products designed for outdoor, fresh water use, and follow label directions to avoid any skin or eye irritation.
In the end, a waterfall splash pad becomes less a product and more a ritual. The same family that once gathered around a dinner table becomes a circle around a mini cascade, learning to take turns, sharing the hose, and negotiating play spaces with grace. The most lasting thing about a project like this is the memories, not the measurements. The practical takeaway is that you can craft a robust water feature in a weekend if you plan ahead, pick materials that balance cost and durability, and design a space that remains welcoming and safe for years to come. The flows of water remind you that summer is a season of simple joys that do not demand vast resources—only careful choices and a bit of patient hands-on work.
Materials quick checklist
- Basin or waterproof container with shallow, sloped sides
- Spill lip or raised edge for the waterfall
- Small pond pump with continuous run capability
- Inline filter and simple strainer
- Surface material that cushions feet and dries well
Safety considerations at a glance
- Use a GFCI outlet and weatherproof connections
- Keep cords and hoses off high-traffic zones
- Ensure the spill lip is smooth and free of sharp edges
- Maintain a dry, non-slip surface around the pad
A deeper dive into the design philosophy reveals a few more nuanced considerations that help a waterfall splash pad stay resilient year after year. The lip design matters because a harsh edge invites accidents and discourages experimentation. A softly curved profile not only reduces risk but also creates a more forgiving splash pattern. The material choice for the lip should be water-resistant and stable in sun. Wood can work if it’s properly treated and sealed, but it requires ongoing maintenance to avoid warping and splinters. Stone or solid composite materials often perform better in the long run, even though the upfront cost may be higher. A little extra care at the outset translates into reduced maintenance headaches during the months you’ll rely on the feature most.
The basin’s lining should be robust but flexible. A heavy-duty PVC liner or a reinforced polyethylene lining offers good protection against punctures and abrasive wear. The key is to ensure you have a clean seam that won’t leak and a way to access the interior for cleaning and possible repairs. A practical trick is to line the basin with a disposable underlayment that you can replace each season if you expect rough use from a high-energy crew. Do not underestimate the importance of a good seal around every joint. Seepage not only wastes water but can degrade the surrounding surface and invite mold growth in shaded corners.
From a performance standpoint, the pump’s duty cycle should align with real use. If the pad hosts a party or a long day of playing in the sun, you want a pump that can run for several hours without overheating. It’s not just about power. It’s about reliability. You should expect to switch to a backup pump in a pinch and to have a simple, offline method to drain the basin at the end of the day for cleaning. Draining is an often overlooked part of the process; leaving water standing in heat invites bacteria and smells. A simple, efficient drainage process makes the space ready for the next day’s adventures.
If you want to field-test a waterfall splash pad idea during a shorter stretch of time, you can improvise with a few inexpensive components. A shallow plastic storage bin can act as a temporary basin, a flat-edge wooden plank can serve as a spill lip, and a small pump borrowed from a kiddie pool can run the system for a weekend. Of course, you’ll want to replace these with more durable pieces once you’re sure about the concept. The benefit of this approach is that you learn, firsthand, how your family interacts with the space, what kind of movement and water flow they enjoy, and how the equipment stands up to the heat and the variable outdoor climate.
If you’re thinking about the longer horizon, you may consider adding features such as a second spill lip to create a two-stage waterfall, or a shallow “pond” area for toys and decorations. A second axis of water flow introduces new play dynamics. You can also alternate spray patterns with a simple flow valve, allowing you to change how water exits the lip and how it travels across the surface. These design expansions are not just about novelty; they provide new ways for kids to engage with the space, which helps sustain interest across multiple summers.
A practical anecdote speaks to how gradual improvements foster a sense of ownership. After the first season, our family decided to repaint the lip and replace the liner, which were the two weak points that had shown the most wear. The changes paid off in a more precise, quieter waterfall and a surface that stayed cooler on hot days. It’s not glamorous work, but it’s the kind that yields big returns in how the space feels. The kids noticed the difference immediately, and the space took on a more defined personality as a result. The result was not a perfect, showroom feature but a reliable, beloved part of our summer routine.
If your project grows into a more ambitious install, you’ll face trade-offs that are worth thinking through early. A larger pad means more materials, more surface area to dry, and a more powerful pump and filtration system. A deeper basin allows for longer play but increases the risk of unsupervised immersion. The key is to establish boundaries that keep water the right shape and depth for safety while still delivering that wonderful water park experience. You can find the right equilibrium by thinking of it as a living system: it should be responsive to use, weather, and maintenance rhythm. The best setups emerge when you allow room for adjustment after the first summer, rather than trying to lock in a design that will become a liability down the line.
In one of our favorite weekends, we built a small extension to the lip, added a second surface to create a gentle slope, and installed a mesh cover over the basin for extra safety during the hottest part of the day. The changes did not require a new pump or fancy plumbing; they were adjustments to the geometry of the existing layout and to how the water moved across the surface. The result was a more forgiving water flow that gave the kids ample opportunity to sprint toward the lip, feel the cascade, and ride the spray without risking trips and falls.
A note on safety with younger children. Keen to keep the play space open and free of clutter, we kept a rule that only one corridor of water could run at a time. It meant a small ritual for younger kids to line up to get a turn at the waterfall rather than racing all at once, which could become chaotic. The rule kept lines organized, reduced the risk of collisions, and gave caretakers a moment to see who was next and how to rotate groups. The rule also supported the concept of patience as a game, a gentle teaching moment about taking turns that aligns with the more general goals of outdoor play.
Throughout the season, we kept a small notebook for maintenance notes and a log of any repairs. The idea was to capture what worked and what did not, not as a legal document but as a practical memory. If a certain lip edge started to show wear after a dozen hours of sun exposure, we could plan a quick replacement the following week rather than letting it worsen. If the pump ran hot, we could relocate power to a shaded area or add flow-control to reduce the load. These small records created a sense of continuity from year to year, a practical archive of what the space has become and what it can still become.
The social dimension remains the heart of a successful DIY water park at home. It’s a space where kids gain confidence negotiating space, learning to observe safety rules, and developing an appreciation for outdoor play as something more than a quick fix for a hot afternoon. It can be a shared project that brings neighbors into the circle for help with a few summer weekends, a way to build community around a practical, joyful space that doesn’t demand a full weekend away or a large budget. The stories that emerge around the waterfall are often the most valuable part of the project—the little memories that stay with a family long after the season ends.
If you’re deciding between a waterfall splash pad and other water features, consider the different kinds of play each invites. A spray bay or a misting path can be thrilling for infants and toddlers who prefer a lower water impact. A shallow wading pool invites independent play and the chance to practice balance and movement. A waterfall splash pad, with its kinetic water flow and soundscape, often offers the strongest sense of immersion. It frames a play area where movement is constant and water is the central actor. The best arrangement, in my experience, is to mix a few features so that kids at different ages can engage in multiple kinds of play. A pad might sit beside a tiny pool and near a shaded seating area for adults. Together, they form a little ecosystem where family and friends can enjoy the day with less fatigue and more focus on the moment.
To close, the beauty of a DIY water park idea like a waterfall splash pad is that it can be done by a dedicated homeowner without needing a crew of contractors. It rewards careful planning, patient execution, and a willingness to adjust as you learn what your family loves most about water play. It is not a silent, passive feature; it is a dynamic element of your outdoor life that invites exploration, sparks creativity, and occasionally tests your problem-solving skills in the best possible way. If you start with a modest footprint, invest in durable materials, and design with safety and maintenance in mind, you will have a space that transforms not only summer days but the way your family gathers in the fresh air. The result is more than a splash pad; it becomes a little water park that upholds the spirit of play year after year, season after season.